Showing posts with label Living Room. Show all posts

Thursday, October 20, 2011

Lamps, Lamps, and, oh yes, more Lamps

One thing you never, ever have to buy new.

A lamp is one of the easiest things in the world to change and very readily available now that brass has packed up and headed out of town.

If you missed my first two lamp posts, you can find them here and here.

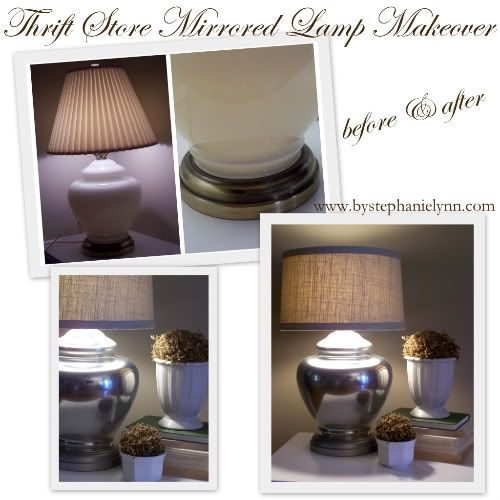
The first lamp came from my grandmothers back porch.  It's a gorgeous lamp with a lot of detail.  The brass just didn't go with anything that I had goin' on, so I pulled out my sandpaper, clean metal primer, and Pewter Gray spray paint.  I refinished them the same exact way I did all my doorknobs.


For the shade, I used some spray adhesive to attach some drop cloth.  The colors blend perfectly together.  And the coolest part about this lamp?  It's got a little switch down at the bottom that you twist to turn it on!


This is also a pretty decent view of my next refinishing project. It's a working record player cabinet that is about to get the works!  When I switch picture angles, you can also see 3 more lamps that are in process :o)  I promise I'm not a strange lamp-lady! 


This one I found in my mom's closet.  I did it awhile back, but I wasn't sure how I felt about it so I didn't share it.  As it turns out, I love it... it just took a little while to grow on me.  (Can I say "it" any more in that sentence? I counted six...)


I sprayed the lamp with a color called "Bright Idea".  If you want to see a much cooler lamp in that color, go see Amy at A Little Piece of Heaven.  I think that's my favorite lamp...ever!

For the shade I used a Tutorial by Stephanie Lynn on how to make faux curled rosewood.  Her wreath is gorgeous and I was originally going to cover the entire shade, but I burned myself 1 too many times and decided to create a pattern.  I really heart it now.


I think of lamps as the icing on the cake.  It's a cheap way to stick your signature in a room.  It takes maybe 10 minutes to spray paint a lamp and I can't tell you how many conversations they start.  It's usually the first things people notice in a room.  Go to goodwill and find a $5 lamp with a fun shape and see what happens.  It's easier than you think :o)

My next attempt?


But I can't find that stinkin' paint anywhere!?  Any suggestions?

Have a great night!

Katie

Partying Here:
The Idea Room
The Shabby Nest
Tatertots and Jello
Be Different, Act Normal
One Artsy Mama
Under the Table and Dreaming
Craft-O-Maniac
Yesterday on Tuesday

Sunday, September 11, 2011

Milk Glass Fetish

About a year ago I fell in love with the color white.


I had always been a brown girl.  In fact my sister called our house the "house of brown" because everything in it was some sort of brown.


I suddenly wanted every piece of furniture white, every lamp white, every picture frame white, a white slipcover (which I still haven't found the money to do), and even a white kitchen (which I got!). Hubby the Great thought I had fallen off the bandwagon.


The color white is just so clean and pretty.  How can you not love it?


It was at this point that I fell in love with this stuff (thanks to Gus and Lula)


Milk Glass.  It is truly beautiful stuff and I suddenly wanted a collection that looked like this all over my house.  What's the best news?  It is everywhere.  In every yard sale and every thrift store from here to timbuktu.  And usually super duper cheap (except for the really fancy stuff)


And these are 3 of the most expensive pieces I own!  On average I have paid .10-.50 a piece.  The big, beautiful pieces I admire are around $10-$15 at the flea market (I'm waiting to score them at a yard sale for half price :)  That's how cheap thrifty I am!)


I love this stuff!  While it may be clutter, it doesn't look as cluttered since it is white.


Transparent moment: Yes, that is a bathroom rug hanging on the back of the chair and a wii balance board sitting on the shelf.  If you could pan down just a little more you could see a chair FULL of laundry.  That's just how my life is.  I'll get to it later....


Gotta love a crazy fetish, right?

A preview of my FAVORITE project yet that I am desperately trying to finish so I can show you!!  It's A-Maz-Ing!  

Saturday, September 3, 2011

Built-In Visual Interest

I love to paint! My most recent victims were the built ins on either side of our fireplace.


When we moved in... this is what we had on either side of our fireplace.  (Not very pretty I know!)  


The other night I showed Hubby the Great this picture from Bibbidi Bobbidi Beautiful at 5 pm.


By 10:00 pm,  he had helped me create this....


I can't believe how much it transformed our living room! Those built-ins will never be the same :o)


Here's what you will need:
a design in mind
graph paper (optional)
ruler/tape measure
paint brush
2 colors of paint (one for the background and one for the design)
painters tape
razor blade

Step One: Draw your dimensions and sketch your design on a sheet of paper. We ALWAYS have graph paper in our house for these such occasions!


Step Two: Sand your surface and wash them with soap and water. I used to skip this part, but learned my lesson! Let it dry thoroughly. If your design is going to be a different color than you already have on the back of your bookcase, paint the backside in the new color and let it dry for a few days so that the painters tape doesn't take it off when you remove it.


Step Three: Use a ruler and/or tape measure to tape design on the back of the bookcase.  Use a razor blade to create clean corners.


Step Four: What you should do is this: Paint over the tape with whatever color your design is going to be (in this case white) and wait for it to dry thoroughly. This will prevent any paint drips and messy lines from the paint seeping through the sides of the tape. What I did was this: spray paint over your tape because you are impatient and want to get the mess out of your living room. Worry about touch up later. This was a bad idea :-)


Please ignore the ugly tangled mess of cords.... they are hidden better in the future :-)

Step Four: Paint over your design with your new color. In this case we chose a color we already had which could probably never be matched again (a whole other story for another day). We will call it "dusty blue" :-)


Step Five: Let it dry thoroughly (again I failed at this part due to my very impatient nature) and carefully remove your tape.


Step Five: Touch up what is necessary with some white paint and wait (arg!) for them to dry.


Step Six: Return shelves and all your other things and spend hours putting them up there just right.


Step Seven: Grab a beverage of choice (Mountain Dew!) and bask in the newfound prettiness of your built-ins (while Hubby the Great basks in the excitement of a new football season.) I know on the inside these built-ins are thanking me a million times over!


Let's look at that before one more time....

And now!


Another tip.... you can make any bookcase look more interesting by changing the look of the back panel. It makes bookcases look less like a big black hole and more like an open display shelf by bringing your eye all the way to the back rather than having it stop at the front.  You can use wrapping paper, scrapbook paper, paint, whatever!  It's a quick and easy thing to do that can really change the look of a room.

Just a thought :-)
-Katie


Partying Here:
Home Stories A to Z

Related Posts Plugin for WordPress, Blogger...